Welcome to Open Seismic!
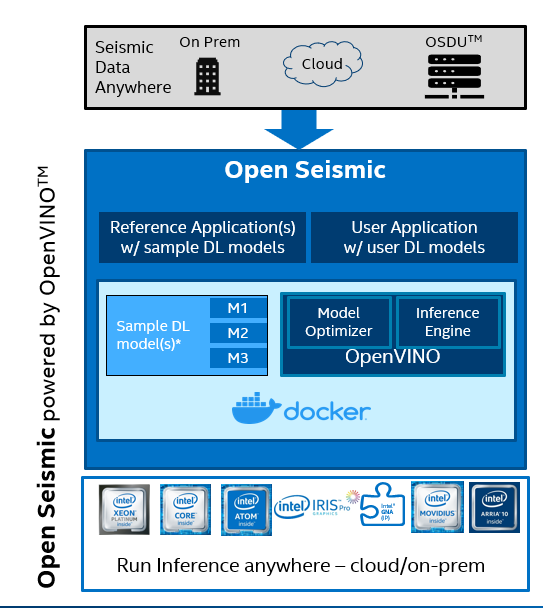
Open Seismic is an open source sandbox environment for developers in oil & gas to perform deep learning inference on 3D/2D seismic data. Open Seismic performs deep learning inference for seismic data with optimizations by OpenVINO™ Toolkit . Open Seismic is containerized to run anywhere and includes publicly available reference models for common tasks: Fault Detection , Salt Identification , Facies Classification.
Installation
Prerequisites
Before building the docker image or installing locally, we need to download some datasets.
You need to install gdown to use the automated downloading script.
$ pip3 install gdown==3.12.2
To download the required data to the proper directory, run setup_dependencies.sh:
$ ./setup_dependencies.sh
Lastly, set up a Python virtual environment and install required dependencies using requirements.txt:
$ python3 -m venv open_seismic
$ source open_seismic/bin/activate
(open_seismic)$ pip install -r ./requirements.txt
Docker
The following command builds the docker image. This is the recommended way of installing Open Seismic and will be the default way that this README interacts with Open Seismic.
$ docker build . -t open_seismic
Note: If you have a proxy, build the docker container using the command below:
$ docker build --build-arg http_proxy=http://my-proxy:port --build-arg https_proxy=http://my-proxy:port . -t open_seismic
If you want to stop a container by name, run:
$ docker stop <container_name>
You can find the <container_name> using the command:
$ docker ps
Next Steps
If you would like to learn more about Open Seismic, please go to our documentation website. If you would like a more interactive learning experience, please go to the examples/ directory and follow the instructions in the notebooks. If you would like to learn more about models that exist within Open Seismic, please go to models/demos/ and look in each folder dedicated to demo’ing a model.
In the examples/ directory, you will find four notebooks:
Example1.ipynb: This notebook will teach you about converting models to OpenVINO IR.Example2.ipynb: This notebook will go over how to define custom preprocessing, postprocessing, and model inference handling scripts.Example3.ipynb: This notebook will walkthrough how to use Open Seismic by using an example JSON config file.Example4.ipynb: This notebook allows users to rapidly get started with using Open Seismic by editing a couple of variables in the notebook.
In the models/demos/ directory, you will find three demo notebooks. Each notebook goes over how to utilize the given models in Open Seismic.
Local
Users can also choose to locally install Open Seismic outside of a Docker container. This option is not recommended.
Install Intel’s Distribution of OpenVINO. The required version of OpenVINO is 2021.2 or greater. Documentation for installation can be found here.
Execute the following commands in a terminal window: .. code-block:
$ python3 -m venv open_seismic
$ source open_seismic/bin/activate
(open_seismic)$ pip install -r ./requirements.txt
Inference
General Purpose Example (Handling model conversion, optimization, and inference):
$ docker run –v /path/to/vol/:/core/vol/ –v /path/to/runs/:/core/runs/ -v /path/to/models/:/core/python/models/ open_seismic /bin/bash ./run.sh "–c /path/to/config.json"
Note above that the file paths in the script options must be from root of the docker container: “/”. Recommended file structure is introduced in the documentation.
For more information, please reference the details sections below. For a more hands-on approach, use our example notebooks located at examples/ to get familiar with Intel Infer Seismic. If you would like a more hands-on experience with using Open Seismic’s models, go to models/ and navigate to the directory associated with your model of choice.
Visualization
An example of how to use our visualizer is featured below:
$ ./core/executables/visualize.sh --input fseg_output --output visualization --model_type fault --slice_no 100
Output visualized images will be saved to path/to/runs/latest_data_folder/visualization.
Note: Since visualize.sh works with the last inference, please make sure its type is the same as the visualization type. You also must install the Python dependencies in requirements.txt.
Citations
If you use this toolbox or benchmark in your research, please cite the following papers:
@article{wu2019faultSeg,
    author = {Xinming Wu and Luming Liang and Yunzhi Shi and Sergey Fomel},
    title = {Fault{S}eg3{D}: using synthetic datasets to train an end-to-end convolutional neural network for 3{D} seismic fault segmentation},
    journal = {GEOPHYSICS},
    volume = {84},
    number = {3},
    pages = {IM35-IM45},
    year = {2019},
}

@article{doi:10.1190/tle37070529.1,
    author = { Anders U. Waldeland  and  Are Charles Jensen  and  Leiv-J. Gelius  and  Anne H. Schistad Solberg },
    title = {Convolutional neural networks for automated seismic interpretation},
    journal = {The Leading Edge},
    volume = {37},
    number = {7},
    pages = {529-537},
    year = {2018},
}

@article{alaudah2019machine,
    title={A Machine Learning Benchmark for Facies Classification},
    author={Yazeed Alaudah and Patrycja Michalowicz and Motaz Alfarraj and Ghassan AlRegib},
    year={2019},
    eprint={1901.07659},
    archivePrefix={arXiv},
    primaryClass={eess.IV}
}